Keeping your keyboard clean is an important aspect of maintaining your computer. Over time, keyboards can accumulate dirt, dust, and even food particles, which can lead to reduced performance and even damage. In this article, we will discuss the importance of cleaning your keyboard and provide tips on how to do it effectively.
One of the main reasons to clean your keyboard is to prevent the buildup of germs and bacteria. Keyboards are a common breeding ground for bacteria, especially if they are shared among multiple people. Regular cleaning can help to reduce the risk of infection and illness. Additionally, keeping your keyboard clean can help to extend its lifespan and prevent damage to the keys and internal components.
When it comes to cleaning your keyboard, there are a few different methods you can use. Some people prefer to use compressed air to blow out any dirt or debris, while others prefer to use a cleaning solution or wipes. It’s important to choose a method that is safe for your specific keyboard and to follow the manufacturer’s instructions. By taking the time to clean your keyboard regularly, you can help to ensure that it stays in good condition and performs optimally.
Understanding Keyboard Types
Mechanical Keyboards
Mechanical keyboards are popular among gamers and typists alike due to their tactile feedback and durability. These keyboards use individual mechanical switches for each key, which provide a satisfying click or bump when pressed. The switches come in different types, such as Cherry MX or Kailh, and offer varying levels of actuation force and noise.
Cleaning a mechanical keyboard requires removing the keycaps and using a brush or compressed air to remove dust and debris from the switches. It is important to avoid getting any liquid inside the switches, as this can damage them.
Membrane Keyboards
Membrane keyboards are the most common type of keyboard, found in most offices and homes. These keyboards use a rubber dome or membrane under the keys to provide tactile feedback. They are generally less expensive and quieter than mechanical keyboards.
Cleaning a membrane keyboard involves wiping it down with a damp cloth or using a can of compressed air to remove dust and debris. It is important to avoid getting any liquid inside the keyboard, as this can damage the membrane.
Laptop Keyboards
Laptop keyboards are similar to membrane keyboards, but are designed to be thin and lightweight for portability. They often use scissor switches or butterfly switches to provide tactile feedback.
Cleaning a laptop keyboard requires being gentle and using a soft-bristled brush or compressed air to remove dust and debris. It is important to avoid pressing too hard on the keys, as this can damage the switches or the keyboard itself.
Overall, understanding the type of keyboard you have is important for proper cleaning and maintenance. By using the appropriate tools and techniques, you can keep your keyboard in good condition for years to come.
Preparation for Cleaning
Before starting the cleaning process, it is important to properly prepare your workspace and gather the necessary materials. This section will outline the steps to take before beginning to clean your keyboard.
Gathering Materials
To clean your keyboard, you will need the following materials:
- Microfiber cloth
- Compressed air can
- Cotton swabs
- Isopropyl alcohol (at least 70% concentration)
- Water
- Bowl or container
- Toothbrush (optional)
It is important to make sure that the microfiber cloth and cotton swabs are clean and free of debris before using them on your keyboard. The compressed air can should be held upright during use to prevent any liquid from escaping and damaging your keyboard.
Initial Keyboard Assessment
Before starting the cleaning process, it is important to assess the condition of your keyboard. Check for any visible debris, such as crumbs or hair, and remove them with a soft brush or by shaking the keyboard upside down.
Next, turn off your computer or disconnect the keyboard to prevent any accidental keystrokes while cleaning. It is also recommended to take a photo of your keyboard before cleaning to ensure that all keys are returned to their proper position.
By properly preparing your workspace and gathering the necessary materials, you can ensure a successful and safe cleaning process for your keyboard.
Routine Cleaning
Keeping a keyboard clean is essential to maintain its longevity and performance. Routine cleaning can help prevent the buildup of dirt, dust, and debris that can interfere with the keyboard’s functionality.
Dusting Off Debris
The first step in routine cleaning is to dust off any debris from the keyboard. This can be done by using a can of compressed air or a soft-bristled brush. Hold the keyboard upside down and gently tap or brush the bottom to remove any loose debris. Then, use the compressed air to blow out any remaining dust or debris from between the keys.
Wiping Surfaces
After dusting off the debris, the next step is to wipe down the surfaces of the keyboard. Use a soft, lint-free cloth that has been lightly dampened with water or a mild cleaning solution. Avoid using harsh chemicals or abrasive materials that can damage the keyboard’s surface.
Gently wipe down the keys and the surrounding areas, being careful not to get any moisture or cleaning solution inside the keyboard. Pay special attention to the areas between the keys, as this is where dirt and debris tend to accumulate.
By following these simple steps, routine cleaning can help keep a keyboard in good working condition and extend its lifespan.
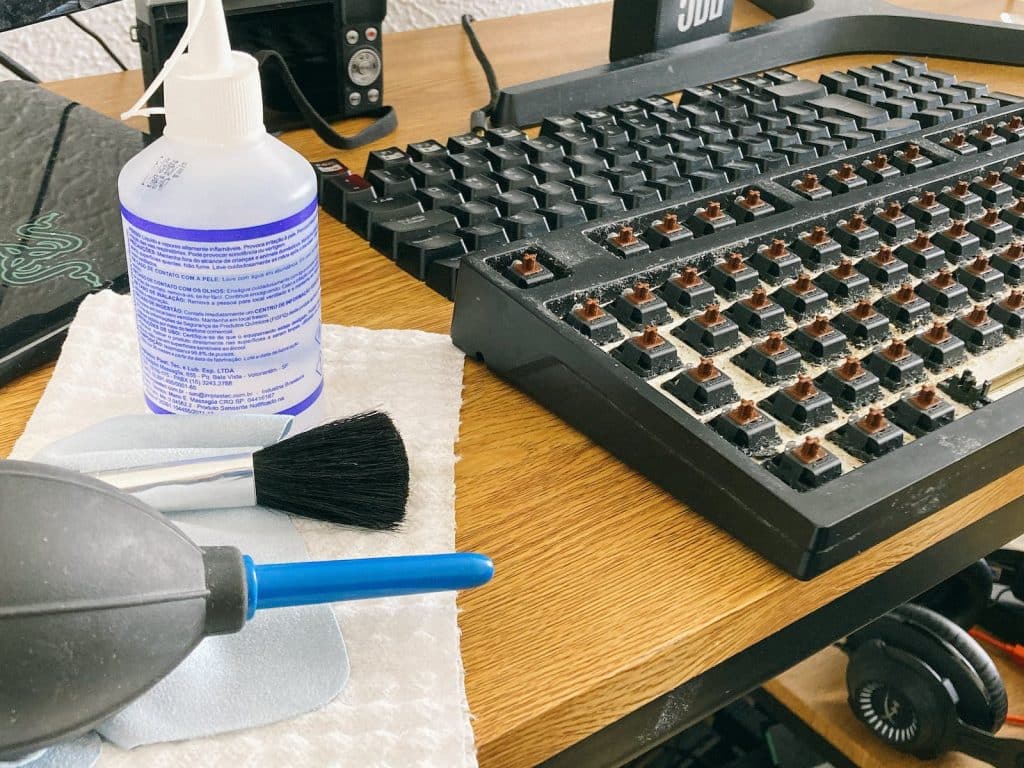
Deep Cleaning Procedures

Keycap Removal
To start deep cleaning your keyboard, the first step is to remove the keycaps. This will allow you to access the key switches and the area underneath the keys. Use a keycap puller to carefully remove each keycap, taking care not to damage the switches or the keycaps themselves.
Once you have removed all the keycaps, place them in a bowl of warm, soapy water and let them soak for a few minutes. This will help to remove any dirt, grime, or oils that have accumulated on the surface of the keycaps. Then, use a soft-bristled brush to gently scrub each keycap, taking care not to scratch or damage them. Rinse the keycaps thoroughly with clean water and let them dry completely before reattaching them to your keyboard.
Cleaning Key Switches
After removing the keycaps, you can clean the key switches themselves. Use a can of compressed air to blow out any dust or debris that may have accumulated inside the switches. Then, use a small, soft-bristled brush to gently clean the switches, taking care not to damage any of the delicate components inside.
If there is any dirt or grime that is particularly stubborn, you can use a cotton swab dipped in isopropyl alcohol to clean the affected areas. Be sure to let the alcohol evaporate completely before reassembling your keyboard.
Stabilizer Care
Finally, it’s important to pay attention to the stabilizers on your keyboard. These are the small plastic pieces that help to keep larger keys, such as the spacebar, stable and level. To clean the stabilizers, use a small brush or cotton swab to gently remove any dirt or debris that may have accumulated.
If there is any visible damage to the stabilizers, such as cracks or breaks, it may be necessary to replace them. However, in most cases, a thorough cleaning will be all that is needed to keep your keyboard in top condition.
Drying and Reassembly
Once the keyboard has been thoroughly cleaned and all the components have been washed and dried, it’s time to reassemble the keyboard. This process should be done with care to avoid any damage to the components.
First, ensure that all the components are completely dry before reassembling the keyboard. Any residual moisture can cause damage to the keyboard and reduce its lifespan.
Next, carefully place the keycaps back onto the keyboard. It’s important to ensure that each keycap is placed in the correct position to avoid any issues with typing later on. A good way to do this is to refer to a keycap map or take a picture of the keyboard before disassembly.
After the keycaps are in place, reattach the stabilizers and the spacebar. Make sure that the stabilizers are securely fastened to avoid any wobbling or sticking keys.
Finally, plug in the keyboard and test all the keys to ensure that they are working properly. If any keys are not working, double-check the placement of the keycap or the stabilizer before disassembling the keyboard again.
By following these steps and taking care during the reassembly process, the keyboard should be as good as new and ready to use for years to come.
Maintenance Tips
Regular Upkeep
Keeping your keyboard clean is an essential part of its maintenance. Regularly dusting it off with a microfiber cloth can help prevent dust and debris from accumulating between the keys. For a deeper clean, use a can of compressed air to blow out any stubborn particles.
It’s also a good idea to disinfect your keyboard regularly, especially if it’s shared by multiple people. Use a disinfectant wipe or spray to clean the surface of the keyboard and keys. Be sure to avoid getting any moisture inside the keyboard, as this can cause damage.
Spill Management
Accidents happen, and spills on your keyboard are no exception. If you spill liquid on your keyboard, immediately turn it off and unplug it. Use a cloth or paper towel to soak up as much liquid as possible, and then let the keyboard dry completely before attempting to use it again.
For spills involving sticky substances, such as soda or coffee, it’s best to remove the keycaps and clean them individually. Use a keycap puller or a small flathead screwdriver to carefully remove the keycaps, and then clean them with warm water and dish soap. Be sure to let them dry completely before reattaching them to the keyboard.
By following these maintenance tips, you can keep your keyboard in top condition and extend its lifespan.
Troubleshooting Common Issues
Sticky Keys
One of the most common issues with keyboards is sticky keys. This can happen when dirt, dust, or other debris gets lodged under the keys. To fix this issue, start by turning off the computer and unplugging the keyboard. Then, gently remove the keycaps and clean the area underneath with a soft-bristled brush or compressed air.
If the keys are still sticky, try cleaning them with a solution of equal parts water and isopropyl alcohol. Dip a cotton swab in the solution and gently rub it over the affected keys. Be sure to let the keys dry completely before reassembling the keyboard.
Non-Responsive Keys
If some of the keys on your keyboard are not responding, there are a few things you can try. First, check to see if the issue is with the keyboard or the computer. Try plugging the keyboard into a different USB port or using a different keyboard with the same computer.
If the issue is with the keyboard, try cleaning the affected keys as described above. If that doesn’t work, the issue may be with the keyboard’s circuitry. In this case, it may be necessary to replace the keyboard or have it repaired by a professional.
By troubleshooting common issues like sticky or non-responsive keys, you can keep your keyboard in good working order and avoid the need for costly repairs or replacements.
Professional Cleaning Services
For those who prefer to leave the cleaning to the professionals, there are many companies that offer keyboard cleaning services. These services can range from a basic cleaning to a more thorough deep cleaning.
Professional cleaning services typically use specialized tools and cleaning solutions to remove dirt, dust, and grime from keyboards. They may also disinfect the keyboard to kill any germs or bacteria that may be present.
One advantage of using a professional cleaning service is that they have the knowledge and expertise to clean even the most difficult to reach areas of the keyboard. They can also provide recommendations for maintaining the cleanliness of the keyboard between cleanings.
However, it is important to choose a reputable and experienced cleaning service to ensure that the keyboard is not damaged during the cleaning process. It is also important to consider the cost of the service, as it can be more expensive than cleaning the keyboard yourself.
Overall, professional cleaning services can be a good option for those who want a thorough and efficient cleaning of their keyboard.
Conclusion:
In conclusion, maintaining a clean keyboard is crucial for both hygiene and functionality. This article has covered the importance of regular cleaning to prevent germ buildup and extend the keyboard’s lifespan. We discussed different keyboard types—mechanical, membrane, and laptop—and their specific cleaning needs. Preparation steps like gathering materials and assessing the keyboard’s condition were outlined, followed by detailed instructions for routine and deep cleaning processes. This included dusting, wiping surfaces, keycap removal, cleaning key switches, and stabilizer care. After cleaning, careful drying and reassembly are essential to avoid damage.
Additionally, the article provided maintenance tips for regular upkeep and spill management, troubleshooting common issues like sticky or non-responsive keys, and the option of professional cleaning services for thorough and expert care. By adhering to these guidelines, readers can ensure their keyboards remain in optimal condition, providing a clean, efficient, and enjoyable typing experience.

Experience is what matters at the end!!
Hi! This is Jacob Jay – founder of Keyboardgear.com! From childhood to adulthood, I’ve always remained passionate about IT, and the revolution in this industry, especially gaming on the PC can’t go out of my way. Since I’m an enthusiastic gamer, and I love to experience various gaming accessories, particularly mechanical keyboards, that really boost my gaming adventure manifolds. So, my nerve cells hit me to transfer my experiences into word form and share with others to identify the ideal keyboards perfectly fit for their gaming modes.
I know very well how hard it is to find the high-quality items available on the internet that ought to be exactly the same as seen as on the screen. But the counterfeiters have ruined the user’s trust. As I have passed all such situations, I’m obliged to deliver the genuinity and express the same as what I am saying.
So, now, I’m working on the mission to provide very helpful and frankly but trustworthy reviews and guides about various mechanical keyboards, mouses, and other gaming accessories as per my personal experiences and sound knowledge.